Hello there, in this article I will tell you how you can set up/install this software on your pc/laptop. You just have to follow some steps that I have described below with the required software to run this web application.How to install Student Registration Portal project
Required Software:
- Xampp Server.
- One source code editor (not mandatory).
- Web Browser (of your choice).
Procedure:
-
First of all download and install the Xampp server and install it. After
the installation has completed, open it and start the MySQL and Apache
server.
- Now extract the zip file (Student Registration Portal) and paste all the files inside htdocs folder which is situated inside the xampp folder. If you have installed the Xampp server software inside the C drive of your computer then the address where you have to paste the extracted file would be C--->xampp--->htdocs-->Student_Registration_Portal.
-
Now that you have done that, it's time to view our project Head towards
your web browser and open a new tab then in the address bar type
localhost, and hit the enter button. You will be prompted by a welcome
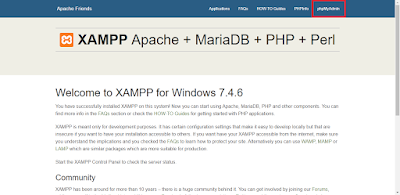
page from Xampp Apache + MariaDB + PHP + Perl. If you didn't get this
page write in the URL localhost/dashboard.
-
Now click on the phpMyAdmin button which is situated in the
top-right of the welcome page.
-
As soon as you click on the phpMyAdmin button you will be redirected to
the localhost/phpMyAdmin page.
-
Here you have to click on the Databases option from the main menu.
-
Write the name of the database i.e., "studentregistrationportal" in the
database name input field. After giving the name click on the create
button. Note that; please don't change the name of the database, if
changed the whole project will stop working.
-
After creating the database, select the import option from the main
menu. On this page, you will see a label called File to import. Click on
the choose file button and select the "SQL" file which is provided
inside the database folder in the Student_Registration_Portal zip file
and click on the Go button situated in the bottom-right of the import
page.
- After successful import, open a new tab in your browser, and in the URL bar write "localhost/Student_Registration_Portal" and hit the enter button.
- Now you can see the project is running and you will be welcomed by the login cum registration page of the project.
Note: If you have installed any other database software in the past please stop all the other servers first then start the server of Xampp.
otherwise, it won't start.
You may also like:
If you phase any problems, feel free to contact me.
Thank you.


0 Comments